Admin
April 14, 2026
Have
you ever tried painting a wall and felt the result looked flat or lifeless?
You’re not alone. Many people are now turning to lime paint application techniques to
create walls with depth, texture, and character.
Unlike
standard paints, lime finishes bring a natural, breathable quality that
transforms any space. But getting it right requires the right approach.
In
this guide, you’ll learn exactly how to apply lime paint interior walls, from preparation to
finishing touches. Whether you’re using calceterra lime paint or another premium
product, this step-by-step natural paint how-to will help you achieve professional
results.
Understanding Lime Paint Before You
Begin
Before
starting any lime paint
application, it’s important to understand how this material behaves.
Lime
paint is made from natural limestone and pigments. It doesn’t sit on the
surface like traditional paint. Instead, it absorbs into the wall, creating a
soft, matte finish.
This
means your technique matters more than ever.
Unlike
emulsion, lime paint thrives on movement and variation. Brush strokes are not
hidden—they are part of the final look.
Ask
yourself: are you comfortable embracing a slightly imperfect finish? If yes,
you’re already on the right track.
Professionals
often say, “Lime paint rewards confidence, not perfection.” Keep that in mind
as you begin.
Preparing Interior Walls for Lime
Paint
Clean and Assess the Surface
Proper
preparation is the foundation of successful lime paint interior walls.
Start
by cleaning the surface. Remove dust, grease, and loose particles. Any
imperfections will show through the finish.
Check
if the wall is porous. Lime paint works best on plaster, brick, or stone.
Prime if Necessary
If
your wall has been previously painted with a non-porous finish, you’ll need a
mineral primer.
This
step ensures proper adhesion and even absorption. Skipping it can lead to
patchy results.
When
using calceterra lime
paint, always follow the manufacturer’s primer recommendations for
the best outcome.
Repair and Smooth
Fill
cracks or holes and lightly sand the surface if needed.
You
don’t need a perfectly smooth wall. In fact, slight texture can enhance the
final look.
Think
of it as creating a canvas rather than a flawless surface.
Tools You’ll Need for Lime Paint
Application
Having
the right tools makes a big difference in your lime paint application results.
You’ll
need a large, high-quality brush. Avoid rollers, as they don’t create the
desired texture.
A
mixing stick is essential to ensure the paint is evenly blended before use.
You
may also need a spray bottle with water. This helps control absorption and
blending during application.
Protective
sheets and tape will keep your space clean while you work.
Investing
in good tools saves time and improves the final finish.
Step-by-Step Lime Paint Application
Process
First Coat: Building the Base
Start
your lime paint application with a well-mixed product.
Apply
the first coat using loose, crisscross brush strokes. Work in small sections to
maintain a wet edge.
Don’t
worry if it looks uneven. This is completely normal at this stage.
The
goal is to create a base layer that allows the second coat to shine.
Second Coat: Creating Depth
Once
the first coat is dry, apply the second coat.
This
is where the magic happens.
Use
varied brush movements to build texture and depth. You can experiment with
longer strokes or softer blending.
For
a smoother finish, lightly mist the wall with water before applying the second
coat.
This
technique is especially effective when working with calceterra lime paint, as it enhances
the natural variation.
Blending and Finishing
As
you apply the second coat, step back occasionally to assess the look.
Blend
areas where needed, but avoid overworking the surface.
Remember,
the beauty of lime
paint interior walls lies in their natural variation.
Drying and Curing Process
After
completing your lime
paint application, patience is key.
The
paint will dry to the touch within a few hours. However, it continues to cure
over several days.
During
this time, the colour may soften and develop subtle variations.
Avoid
touching or cleaning the wall until it is fully cured.
Ask
yourself: can you wait a few days for a better result? Trust the process—it’s
worth it.
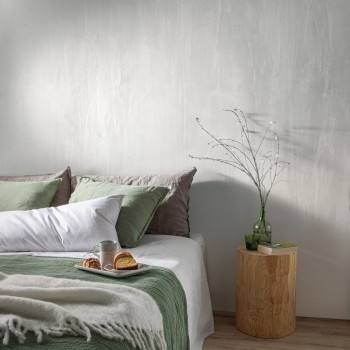
Real Example: A Bedroom Makeover
A
homeowner in Manchester recently used this natural paint how-to approach to refresh their
bedroom.
They
chose a soft neutral shade of calceterra lime paint. The goal was to create a calm,
relaxing space.
After
applying two coats, the walls developed a gentle, cloud-like texture. Natural
light enhanced the depth throughout the day.
The
result was a serene environment that felt both modern and timeless.
This
shows how the right lime
paint application technique can completely transform a room.
Common Mistakes to Avoid
Even
simple projects can go wrong without proper care.
One
common mistake is overworking the paint. This can reduce texture and create
unwanted marks.
Another
issue is poor surface preparation. Skipping primer or cleaning leads to uneven
absorption.
Using
the wrong tools is also a problem. Rollers won’t give you the desired effect.
Finally,
rushing the process can ruin the finish. Allow each coat to dry properly before
moving on.
Avoid
these mistakes, and your lime
paint interior walls will look stunning.
Pro Tips for a Perfect Finish
Start
with a sample area. This helps you understand how the paint behaves.
Work
with natural light whenever possible. It allows you to see texture and
variation clearly.
Keep
your strokes relaxed and consistent. Overthinking can lead to uneven results.
Consider
combining techniques. For example, mix soft blending with bold strokes for a
unique finish.
As
one expert says, “Lime paint is about expression, not control.”
Final Thoughts
Mastering
lime paint application
is not about perfection. It’s about understanding the material and working with
it.
From
preparation to finishing touches, each step plays a role in the final result.
Whether
you’re using calceterra
lime paint or exploring your own natural paint how-to, the key is to embrace
the process.
Start
small, experiment with techniques, and build confidence as you go.
Soon,
your walls won’t just be painted—they’ll tell a story of texture, depth, and
timeless design.